
Mastering the art of milk frothing with a hand frother can elevate your homemade beverages to a whole new level. Whether you’re crafting a creamy cappuccino or adding a luxurious touch to your morning coffee, learning how to froth milk with a hand frother is a simple skill that can make all the difference. This guide will walk you through the basics of using a hand frother to achieve smooth, velvety froth. It’s a quick, affordable way to enjoy barista-quality drinks without leaving your kitchen. Let’s dive into the techniques that will help you perfect your fighting skills.
Selecting the Right Milk
Choosing the perfect milk is key to achieving the ideal froth. Opt for whole milk for a rich, creamy texture, or experiment with 2% or skim milk for lighter options. Plant-based alternatives like almond or oat milk can also be frothed, though results may vary. Consider factors like fat content and protein when making your selection. By choosing the right milk, you’ll set the stage for a deliciously frothy beverage that suits your taste preferences.
Heating the Milk
Properly heating the milk is essential for successful frothing. Heat your milk gently on the stove or in the microwave, being careful not to let it boil. Aim for a temperature between 140°F to 155°F (60°C to 68°C) for optimal frothing results. Heating the milk helps to improve its texture and makes it easier to create a creamy foam. With the right temperature, you’ll be well on your way to frothing perfection in no time.
Preparing the Hand Frother
Before diving into the frothing process, ensure your hand frother is ready for action. Most hand frothers consist of a whisk-like attachment and a handle. Attach the whisk securely to the frother and ensure it is clean and free of any residue from previous use. Familiarize yourself with the frother’s controls and operation, ensuring you know how to adjust speed and intensity as needed. By properly preparing your hand frother, you’ll be set up for frothing success with every use.
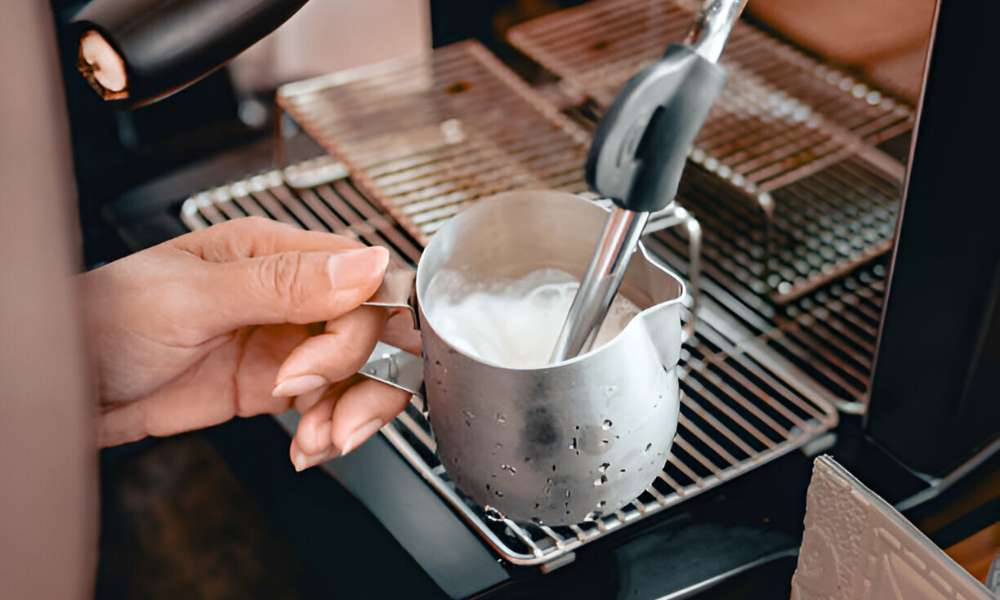
Frothing Process
Once your milk is heated and your hand frother is prepared, it’s time to start frothing. Immerse the whisk attachment of the frother into the milk, ensuring it is fully submerged. Hold the frother at a slight angle to create a vortex, which helps incorporate air into the milk. Turn on the frother and begin frothing in an up-and-down motion, gradually increasing the speed as foam begins to form. Continue frothing until the milk reaches your desired level of foaminess.
Monitoring Foam Consistency
As you froth, keep a close eye on the foam consistency. Aim for a smooth, velvety texture with small, uniform bubbles. Avoid over-frothing, which can result in large bubbles and a less desirable texture. Adjust your technique as needed, varying the speed and intensity of the frother to achieve the perfect foam consistency. With practice, you’ll develop a keen eye for the ideal froth and be able to consistently create deliciously creamy foam for your beverages.
Finishing and Serving
Once the milk is frothed to perfection, it’s time to finish and serve your beverage. Turn off the frother and remove it from the milk, giving the milk a gentle swirl to incorporate any remaining foam. Pour the frothed milk into your coffee, latte, cappuccino, or hot chocolate, using a spoon to hold back the foam if desired. Admire your handiwork as you enjoy a deliciously frothy beverage that rivals your favorite café creations.
Tips for Success
- Start with cold milk for a denser foam.
- Use a tall, narrow container to contain splatters and create a better vortex.
- Experiment with different frothing techniques, adjusting the angle and speed of the frother.
- Avoid over-frothing by monitoring the foam consistency closely.
- Clean the frother thoroughly after each use to prevent milk residue buildup and maintain optimal performance.
Cleaning and Maintenance
After each use, clean the hand frother according to the manufacturer’s instructions. Typically, this involves rinsing the whisk attachment under running water and wiping down the handle with a damp cloth. Avoid submerging the entire frother in water unless it is specifically design to be waterproof. Periodically check for any signs of wear or damage, and replace any worn parts as needed to ensure the frother continues to function properly.
Conclusion
Mastering the art of frothing milk with a hand frother takes practice, but with the right techniques and tips, you can achieve café-quality foam at home. Start by selecting the right type of milk and heating it to the optimal temperature. Prepare your hand frother and immerse the whisk attachment into the milk, creating a vortex to incorporate air. Froth until you reach your desired level of foaminess, then finish and serve your beverage. With patience and experimentation, you’ll soon be whipping up deliciously frothy lattes, and cappuccinos, and more like a seasoned barista.